Gaining access to your favorite tunes on all your devices starts with a simple yet crucial step: authorizing your MacBook for Apple Music. This process not only unlocks a world of music but also ensures a seamless integration of Apple Music across your Apple ecosystem. In this guide, we’ll walk you through the authorization process, delve into the importance of this step, and provide solutions to common issues that may arise. Plus, we’ll answer some frequently asked questions to help you navigate any potential hurdles with ease.
Table of Contents
Understanding Authorization for Apple Music
What is Authorization?
Authorization is a security measure by Apple to ensure that only a limited number of devices can access your purchased music, apps, and other content. It’s a way to protect your digital rights while allowing you flexibility across your devices.
Why Authorize Your MacBook?
Authorizing your MacBook for Apple Music is essential for a number of reasons:
- Access: It allows you to play music purchased from iTunes, listen to Apple Music tracks, and download purchases.
- Sync: Ensures your music library is synced across all your devices, providing a consistent listening experience whether you’re on your MacBook, iPhone, or iPad.
- Security: Helps prevent unauthorized access to your purchased content, safeguarding your digital music library.
Preparing Your MacBook for Authorization
System Requirements
Before you begin, ensure your MacBook meets the following system requirements:
- macOS version compatible with the latest Apple Music app.
- An active internet connection for authorization and access to Apple Music.
- Adequate storage space for downloads.
Updating Your macOS and iTunes
To avoid any hiccups during the authorization process, make sure your MacBook is running the latest version of macOS and iTunes:
- For macOS, go to the Apple menu > System Settings > General > Software Update.
- For iTunes, open the app and select iTunes > Check for Updates from the menu bar.
Signing in with Your Apple ID
Your Apple ID is the key to authorizing your MacBook for Apple Music. Here’s how to sign in:
- Open the Apple Music or iTunes app on your MacBook.
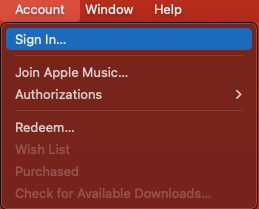
- Navigate to Account > Sign In from the menu bar.
- Enter your Apple ID and password.
Ensuring your MacBook meets the necessary requirements and is signed in with your Apple ID are foundational steps in the authorization process. These preparations pave the way for a smooth and successful authorization, allowing you to enjoy your Apple Music library across all your devices.
Step-by-Step Guide to Authorize Your MacBook
Opening Apple Music or iTunes
Begin by launching the Apple Music or iTunes application on your MacBook. If you’re using macOS Catalina or later, open the Apple Music app. For earlier versions of macOS, iTunes will be your go-to application. This initial step is crucial as it sets the stage for the authorization process. Ensure you’re connected to the internet before proceeding. The application’s interface is designed to be intuitive, offering a straightforward path to access your account settings where the authorization option resides.
Navigating to Account Settings
Once the Apple Music or iTunes app is open, locate the “Account” option on the menu bar at the top of your screen. Clicking on this will reveal a dropdown menu with several options. Look for “Authorizations” in this list and hover over it to see additional choices. Here, you’ll find the “Authorize This Computer” option, which is your next step. This menu path is your gateway to managing device authorizations, allowing you to control which computers can access your Apple Music library.
Authorizing Your MacBook
After selecting “Authorize This Computer,” a prompt will appear asking for your Apple ID and password. This is the same ID you use for all Apple services, ensuring a unified experience across your devices. Enter your credentials carefully and click “Authorize.” By doing so, you’re granting your MacBook permission to access your Apple Music content, including purchases made from the iTunes Store. This step is protected by Apple’s security protocols, ensuring that only you can authorize access to your content.
Verifying Authorization Success
To confirm that your MacBook has been successfully authorized, you can check the status in the same “Account” menu under “Authorizations.” Select “View My Account,” and you may be prompted to sign in again for security reasons. Once in your account information page, scroll down to the “Apple ID Summary” section. Here, you’ll see the number of computers authorized to access your Apple Music and iTunes content. If your MacBook has been successfully authorized, the count will reflect this addition. This verification step is essential to ensure that everything is set up correctly, allowing you to enjoy a seamless music listening experience across your devices.
Following these steps carefully will ensure that your MacBook is authorized for Apple Music, granting you access to your music library and purchases across all your Apple devices.
Troubleshooting Common Authorization Issues
Dealing with Authorization Limits
Apple Music and iTunes impose a limit on the number of devices you can authorize, typically five per Apple ID. If you’ve reached this limit and need to authorize a new device, you’ll need to deauthorize another one first. To manage your device authorizations, go to the “Account” section in Apple Music or iTunes, select “Authorizations,” and choose “Deauthorize This Computer” for any device you no longer use or need access to your content.
Resolving Incorrect Apple ID Issues
If you’re experiencing issues authorizing your MacBook because of Apple ID discrepancies, ensure you’re using the correct Apple ID associated with your Apple Music and iTunes purchases. If you’ve multiple Apple IDs, you might have used a different one for your purchases. Verify which Apple ID was used for purchasing your content by checking your purchase history in the Account Settings. Logging in with the correct Apple ID should resolve the issue.
What to Do If Authorization Fails
Authorization failures can occur for several reasons, including network issues, outdated software, or system errors. First, ensure your internet connection is stable and that you’re running the latest version of macOS and Apple Music or iTunes. If the problem persists, sign out of your Apple ID and sign back in. For persistent issues, contacting Apple Support can provide further assistance and troubleshooting steps.
FAQs
How many devices can I authorize for Apple Music?
You can authorize up to five devices with your Apple ID to access your Apple Music and iTunes content.
What happens if I reach my authorization limit?
If you reach your five-device limit, you’ll need to deauthorize one device before authorizing another to access your content.
Can I deauthorize a device I no longer use?
Yes, you can deauthorize any device you no longer use through the “Account” section in Apple Music or iTunes by selecting “Deauthorize This Computer.”
How do I check how many devices are authorized?
To view the number of authorized devices, go to “Account” > “View My Account” in Apple Music or iTunes, and look under the “Apple ID Summary” section.
What should I do if authorization fails due to an unknown error?
If you encounter an unknown error during authorization, check your internet connection, update your software, and try again. Contact Apple Support for further assistance if the issue continues.
Conclusion
Authorizing your MacBook for Apple Music ensures you can enjoy your music library seamlessly across all your devices. By following the steps outlined in this guide, you can easily authorize your device, troubleshoot common issues, and manage your device authorizations effectively. Remember, if you encounter any challenges, Apple’s support resources are readily available to assist you. Enjoy your music, and make the most of your Apple Music experience by ensuring your devices are properly authorized.