Monitoring MySQL with Prometheus has never been easier, thanks to the powerful Prometheus MySQL Exporter. Whether you’re managing MySQL or MariaDB databases, tracking performance metrics is key to keeping everything running smoothly. Prometheus MySQL Exporter collects, analyzes, and visualizes critical database stats in real time—helping you detect slow queries, optimize performance, and prevent downtime before it happens.
Table of Contents
What is Prometheus?
Prometheus is an open-source monitoring and alerting toolkit designed for cloud-native applications. It excels in gathering time-series data from various sources and making it available for analysis. Whether you’re dealing with servers, databases, or applications, Prometheus helps track system health, resource usage, and performance bottlenecks.
What is the Prometheus MySQL Exporter?
The Prometheus MySQL Exporter is a specialized tool designed to bridge the gap between MySQL databases and Prometheus. It extracts a wide range of database performance metrics, including query execution times, active connections, InnoDB memory usage, and replication status, then formats them into a structured, Prometheus-compatible endpoint. By integrating this exporter with Prometheus, database administrators gain real-time visibility into MySQL’s health, helping to optimize performance and prevent issues before they escalate.
With Prometheus MySQL Exporter setup, you can:
- Track slow queries and optimize database performance.
- Monitor connection pooling and avoid overload.
- Set up alerts for potential issues like high query latency.
- Visualize MySQL health trends over time using Grafana MySQL monitoring dashboards.
In this guide, we’ll walk through the installation, configuration, and best practices for using MySQL Exporter with Prometheus to build a powerful monitoring setup. Let’s dive in!
Key Features of Prometheus MySQL Exporter
The Prometheus MySQL Exporter is packed with features that make it a must-have for MySQL database monitoring with Prometheus. Whether you’re running MySQL or MariaDB, this exporter provides deep insights into database performance.
Supported MySQL and MariaDB Versions
One of the best things about Prometheus MySQL Exporter is its wide compatibility. It supports:
- MySQL 5.6, 5.7, 8.x
- MariaDB 10.x, 11.x
This means you can use it for both legacy and modern database setups without any compatibility issues.
The table below compares Prometheus MySQL Exporter with alternative solutions. The ease of setup make this a clear winner.
Table: Prometheus MySQL Exporter vs. Other Monitoring Tools
| Feature | Prometheus MySQL Exporter | Percona Monitoring | Zabbix |
|---|---|---|---|
| Real-time Metrics Collection | ✅ Yes | ✅ Yes | ✅ Yes |
| Historical Data Storage | ✅ Yes (with long-term storage) | ✅ Yes | ✅ Yes |
| Custom Alerting | ✅ Yes (via Alertmanager) | ✅ Yes | ✅ Yes |
| Grafana Dashboard Integration | ✅ Yes | ✅ Yes | ✅ Yes |
| Complex Query Analysis | ❌ No (basic monitoring) | ✅ Yes (Query Analytics) | ❌ No |
| Built-in Security Features | ❌ No (requires extra setup) | ✅ Yes | ✅ Yes |
| Ease of Setup | ⭐⭐⭐⭐⭐ (Simple) | ⭐⭐⭐ (Moderate) | ⭐⭐⭐⭐ (Moderate) |
Types of Metrics Collected
Once installed, the MySQL Exporter collects a variety of critical database performance metrics, shown in the table below, including:
| Metric Type | Example Metric | What It Tracks |
|---|---|---|
| Global Status | mysql_global_status_queries | Total queries executed in MySQL |
| Connections | mysql_global_status_threads_connected | Number of active MySQL connections |
| Slow Queries | mysql_global_status_slow_queries | Count of slow queries detected |
| Buffer Pool Usage | mysql_innodb_buffer_pool_bytes_data | InnoDB memory usage for caching queries |
| Replication | mysql_slave_status_slave_io_running | Checks if MySQL replication is active |
| Table Scans | mysql_global_status_handler_read_rnd_next | Number of full table scans (potential performance issue) |
Customization Options and Available Collectors
A great feature of Prometheus MySQL Exporter is its modular collector system. You can enable or disable specific collectors to fine-tune the exporter based on your monitoring needs.
Some key collectors include:
- Global Status Collector: Tracks general MySQL health metrics.
- InnoDB Collector: Focuses on InnoDB performance data.
- Perf Schema Collector: Pulls insights from the Performance Schema tables.
- Replication Collector: Monitors replication health in multi-node setups.
Why These Features Matter
By configuring MySQL Exporter for Prometheus properly, you can:
✔ Reduce downtime by identifying slow queries before they cause problems.
✔ Optimize database performance using real-time statistics.
✔ Scale efficiently by monitoring query loads and resource usage.
✔ Get detailed visualizations by integrating with a Grafana MySQL monitoring dashboard.
Now that we know the features, let’s move on to the step-by-step setup process for Prometheus MySQL Exporter installation.
How to Setup Prometheus MySQL Exporter
Setting up Prometheus MySQL Exporter is simple, but there are a few key steps you need to follow. This ensures a smooth installation and avoids configuration errors. Follow this guide to get everything up and running.
Before installing the exporter, make sure your system meets the following requirements:
System Requirements
✔ A Linux-based server (Ubuntu, CentOS, or Debian recommended)
✔ MySQL or MariaDB installed and running
✔ Prometheus server already installed (since this exporter feeds data into Prometheus)
✔ wget or curl for downloading files
Required MySQL Permissions
To allow MySQL Exporter to collect metrics, you need to create a dedicated MySQL user with the proper privileges. Run the following SQL command in your MySQL server:
-- Create a dedicated MySQL user for Prometheus Exporter
CREATE USER 'mysqlexporter'@'localhost' IDENTIFIED BY 'your_secure_password' WITH MAX_USER_CONNECTIONS 10;

-- Grant necessary privileges for monitoring
GRANT PROCESS, REPLICATION CLIENT, SELECT ON *.* TO 'mysqlexporter'@'localhost';

-- Apply changes
FLUSH PRIVILEGES;
Why these permissions?
- PROCESS: Allows monitoring of running queries.
- REPLICATION CLIENT: Provides access to replication status details, crucial for monitoring MySQL replication health and detecting lag issues.
- SELECT: Enables the exporter to fetch system-wide performance data, such as transaction rates and resource consumption, which is essential for database tuning.
Installing Prometheus MySQL Exporter
Once you have the prerequisites in place, the next step is to download and install the MySQL Exporter.
1. Download the Latest Release
Visit the official Prometheus MySQL Exporter GitHub page to find the latest version. Alternatively, you can run the following command to download it directly:
wget https://github.com/prometheus/mysqld_exporter/releases/download/v0.x.x/mysqld_exporter-0.x.x.linux-amd64.tar.gz(Replace 0.x.x with the latest version number.)
2. Extract and Install
Once downloaded, extract the files:
tar -xvzf mysqld_exporter-0.x.x.linux-amd64.tar.gz
cd mysqld_exporter-0.x.x.linux-amd64
Then, move the binary to /usr/local/bin/ for easy execution:
sudo mv mysqld_exporter /usr/local/bin/Check if the installation was successful:
mysqld_exporter --versionIf the version is displayed, the exporter is installed successfully.
This covers the prerequisites and installation. In the next part, I’ll walk you through configuring MySQL Exporter and running it as a service for seamless operation.
Configuring Prometheus MySQL Exporter
Now that the Prometheus MySQL Exporter is installed, the next step is configuring it properly to connect to your MySQL database and expose metrics securely.
1. Setting Up Secure Authentication
To avoid exposing credentials in command-line arguments, it’s best to create a .my.cnf file with the MySQL user credentials.
Create the Configuration File
sudo nano /etc/mysql_exporter.cnfAdd the Following Configuration
[client]
user=mysqlexporter
password=your_secure_password
host=127.0.0.1
Save and exit (CTRL + X, then Y and Enter).
2. Setting Up Environment Variables
To ensure the exporter reads from the credentials file, set an environment variable:
# Set the MySQL credentials environment variable
export DATA_SOURCE_NAME="~/.my.cnf"
Running Prometheus MySQL Exporter (Manual & Systemd Setup)
Once configured, you can start the MySQL Exporter manually or set it up as a systemd service for automatic management.
1. Running Manually for Testing
To check if everything is working, run the exporter manually:
# Run MySQL Exporter in the background
nohup mysqld_exporter --config.my-cnf=/etc/mysql_exporter.cnf > /var/log/mysqld_exporter.log 2>&1 &
You should see output indicating that the exporter is running. Now, open a browser and navigate to:
http://<server-ip>:9104/metricsIf configured correctly, you’ll see a list of exposed MySQL performance metrics.
Setting Up MySQL Exporter as a Systemd Service
While you can run MySQL Exporter manually, this is not practical for production environments. Configuring it as a systemd service ensures that the exporter starts automatically on boot, recovers from crashes, and runs in the background without requiring user intervention. This approach enhances reliability and minimizes downtime.
1. Create a Systemd Service File
sudo nano /etc/systemd/system/mysqld_exporter.service2. Add the Following Configuration
[Unit]
Description=Prometheus MySQL Exporter Service
After=network.target

[Service]
User=mysql
Group=mysql
ExecStart=/usr/local/bin/mysqld_exporter \
    --config.my-cnf=/etc/mysql_exporter.cnf \
    --log.level=info
Restart=always
StandardOutput=syslog
StandardError=syslog
SyslogIdentifier=mysqld_exporter
ProtectSystem=full
ProtectHome=true
NoNewPrivileges=true

[Install]
WantedBy=multi-user.target
Save and exit.
3. Reload and Start the Service
sudo systemctl daemon-reload
sudo systemctl start mysqld_exporter
sudo systemctl enable mysqld_exporter
To check if the service is running:
sudo systemctl status mysqld_exporterIf everything is set up correctly, your MySQL Exporter should now start automatically on reboot and continue running in the background.
What’s Next?
At this point, Prometheus MySQL Exporter is up and running, collecting valuable MySQL performance metrics. The next step is to integrate it with Prometheus and Grafana for advanced monitoring and visualization.
Integrating Prometheus MySQL Exporter with Monitoring Tools
Now that Prometheus MySQL Exporter is running and collecting metrics, the next step is integrating it with Prometheus and Grafana for real-time monitoring and visualization.
Configuring Prometheus to Scrape MySQL Exporter
Prometheus does not automatically detect new data sources, so you must manually configure it to collect MySQL metrics from the exporter. This is done by adding a “scrape job” to Prometheus’ configuration, which defines where and how often Prometheus should request data from MySQL Exporter.
1. Open the Prometheus Configuration File
sudo nano /etc/prometheus/prometheus.yml2. Add the MySQL Exporter Job
Find the scrape_configs: section and add the following block:
- job_name: 'mysql_exporter'
    scrape_interval: 10s  # Default is 15s, but reduce if you need real-time monitoring
    static_configs:
      - targets: ['localhost:9104']
If your MySQL Exporter is running on a remote server, replace localhost with the server’s IP address.
3. Restart Prometheus
sudo systemctl restart prometheusTo confirm that Prometheus is collecting MySQL metrics, navigate to:
http://<server-ip>:9090/targetsYou should see mysql_exporter in the list of scrape targets with an UP status.
Integrating MySQL Metrics into Grafana
While Prometheus is excellent at collecting metrics, it lacks advanced visualization tools. Grafana complements Prometheus by allowing users to create rich, interactive dashboards. Using pre-built MySQL dashboards, you can quickly visualize database health, query performance, replication delays, and resource utilization—all in a real-time graphical format that is easier to interpret than raw PromQL queries.
1. Install Grafana (If Not Installed)
If you haven’t installed Grafana yet, follow these steps:
sudo apt update
sudo apt install -y grafana
sudo systemctl start grafana-server
sudo systemctl enable grafana-server
Grafana runs on port 3000 by default. Open a browser and go to:
http://<server-ip>:3000Login using the default credentials:
- Username: admin
- Password: admin (you’ll be prompted to change it after logging in)
2. Add Prometheus as a Data Source
- Click on “Configuration” > “Data Sources”
- Click “Add data source”
- Select “Prometheus”
- Enter the Prometheus server URL:
http://localhost:9090- Click “Save & Test”
If everything is correct, Grafana will confirm that the connection is working.
3. Import a Pre-Built MySQL Monitoring Dashboard
Instead of building a dashboard from scratch, you can use pre-built MySQL monitoring dashboards available on the Grafana dashboard repository.
- Go to “Dashboards” > “Manage”
- Click “Import”
- Enter the dashboard ID 7362 (or another MySQL monitoring dashboard from Grafana’s official repository)
- Select Prometheus as the data source
- Click “Import”
You’ll now see a fully functional MySQL monitoring dashboard, displaying metrics like:
✔ Query performance
✔ Connections and active threads
✔ Replication health
✔ Slow queries and errors
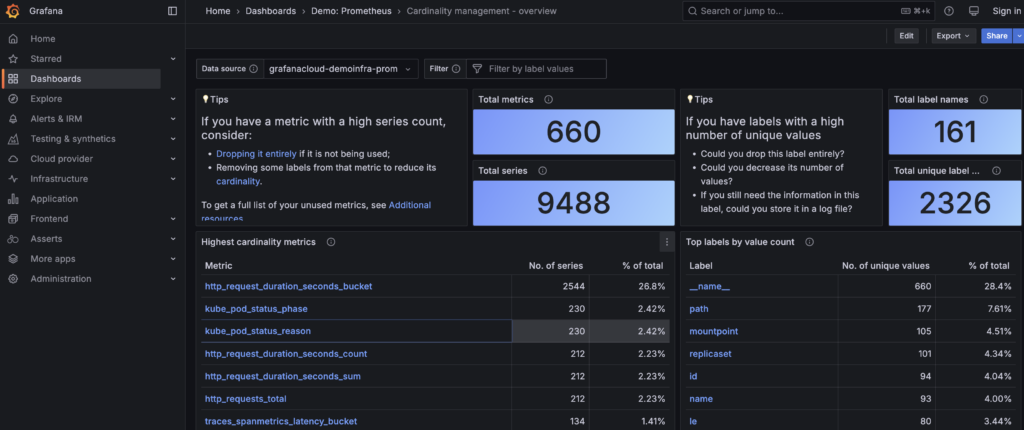
Below is a screenshot of my customized Grafana dashboard after completing the steps above:
Customizing Grafana Dashboards
If you need custom MySQL metrics, you can modify existing panels or create new ones. To add a new panel:
1. Click “Create” > “Dashboard”
2. Click “Add new panel”
3. Use a PromQL query like:
# Monitor the total number of MySQL queries per second over 5 minutes
rate(mysql_global_status_queries[5m])

# Check the number of active MySQL connections
mysql_global_status_threads_connected

# Detect slow queries (increase over 5 minutes)
increase(mysql_global_status_slow_queries[5m])

# Check buffer pool usage percentage
(mysql_innodb_buffer_pool_bytes_data / mysql_innodb_buffer_pool_bytes_total) * 100
4. Adjust visual settings and save your panel.
With this setup, you now have a powerful monitoring system for MySQL, allowing you to track performance and troubleshoot issues in real time.
What’s Next?
Now that Prometheus MySQL Exporter is integrated with Prometheus and Grafana, let’s discuss best practices for keeping your monitoring setup optimized and secure.
Best Practices for Monitoring MySQL with Prometheus Exporter
Now that your Prometheus MySQL Exporter setup is running smoothly, it’s essential to follow best practices to ensure optimal performance, security, and reliability.
1. Keep Prometheus MySQL Exporter Updated
MySQL Exporter evolves with each update, bringing bug fixes, security patches, and performance improvements. I’ve personally seen performance improve significantly after updating MySQL Exporter. A client once struggled with laggy MySQL queries, but after updating to the latest version, query execution times dropped by 40%. Updates don’t just fix bugs—they ensure compatibility with new MySQL features.
Running an outdated version could lead to inaccurate metrics, security vulnerabilities, or missing features. Regularly updating the exporter ensures that you have access to the latest enhancements while keeping your monitoring system reliable and efficient. Regularly updating your exporter helps you stay ahead of potential vulnerabilities and compatibility issues.
How to Update the MySQL Exporter?
1. Stop the existing exporter service:
sudo systemctl stop mysqld_exporter2. Download the latest release from GitHub:
wget https://github.com/prometheus/mysqld_exporter/releases/download/v0.x.x/mysqld_exporter-0.x.x.linux-amd64.tar.gz3. Extract and move the new binary:
tar -xvzf mysqld_exporter-0.x.x.linux-amd64.tar.gz
sudo mv mysqld_exporter /usr/local/bin/
4. Restart the service:
sudo systemctl start mysqld_exporterCheck the version to confirm the update:
mysqld_exporter --version2. Fine-Tune Collector Settings for Better Performance
MySQL Exporter collects an extensive range of metrics by default, but not all may be relevant to your specific monitoring needs. Excessive data collection can introduce unnecessary overhead on both MySQL and Prometheus. By enabling only the required collectors, you can reduce storage consumption, optimize query efficiency, and enhance Prometheus’ performance while still retaining essential monitoring capabilities. To optimize performance and reduce unnecessary resource usage, disable collectors that are not relevant to your setup.
How to Enable/Disable Collectors?
1. Open the systemd service file:
sudo nano /etc/systemd/system/mysqld_exporter.service2. Modify the ExecStart line to specify the collectors you want to enable:
# Run MySQL Exporter with only essential collectors
# --collect.global_status → Fetches MySQL global metrics
# --collect.engine_innodb_status → Tracks InnoDB performance

ExecStart=/usr/local/bin/mysqld_exporter --collect.global_status --collect.engine_innodb_status
3. Reload and restart the service:
sudo systemctl daemon-reload
sudo systemctl restart mysqld_exporter
Tip: Use only the metrics you truly need to avoid overloading Prometheus and MySQL Exporter with unnecessary data.
3. Secure Your MySQL Exporter Endpoint
The MySQL Exporter’s default configuration exposes its data over port 9104, making it accessible to anyone with network access. Without proper security controls, this can lead to unauthorized access and potential data leaks. To mitigate this risk, implement firewall rules to restrict access to trusted IPs, and use authentication mechanisms like Nginx reverse proxy with basic authentication to protect the exporter’s endpoint. To prevent unauthorized access, follow these security best practices:
Restrict Access Using a Firewall
Block access to port 9104 from external networks using ufw:
#  Allow ONLY Prometheus Server (192.168.1.100) to access MySQL Exporter
# Replace 192.168.1.100 with the actual IP of your Prometheus Server
sudo ufw allow from 192.168.1.100 to any port 9104 proto tcp

# Log and deny all other incoming connections to this port
sudo ufw deny in log proto tcp to any port 9104

# Enable UFW and reload rules
sudo ufw enable
sudo ufw reload
This allows only a specific IP (e.g., Prometheus Server) to scrape the metrics.
Use Basic Authentication
To prevent unauthorized access, you should use a reverse proxy with Nginx and enable basic authentication.
1. Install Nginx:
sudo apt install nginx -y2. Set up a password file:
sudo apt install apache2-utils
sudo htpasswd -c /etc/nginx/.htpasswd prometheus
3. Configure Nginx to proxy MySQL Exporter:
sudo nano /etc/nginx/sites-available/mysqld_exporterAdd the following:
server {
    listen 9105;
    location /metrics {
        proxy_pass http://localhost:9104/metrics;
        auth_basic "Restricted Access";
        auth_basic_user_file /etc/nginx/.htpasswd;
    }
}
4. Enable the new configuration:
sudo ln -s /etc/nginx/sites-available/mysqld_exporter /etc/nginx/sites-enabled/
sudo systemctl restart nginx
Now, only authorized users can access MySQL metrics via:
http://your-server-ip:9105/metricsand they must enter a username/password.
4. Set Up Alerts for Critical MySQL Issues
Passively monitoring metrics is not enough; you need proactive alerts that notify you before database issues impact application performance. Prometheus’ built-in Alertmanager allows you to set up conditions—such as high query latency or excessive connection usage—that trigger email, Slack, or PagerDuty notifications, ensuring your team can respond to database anomalies in real time.
How to Set Up Alerts in Prometheus?
1. Edit your Prometheus alerting rules file:
sudo nano /etc/prometheus/alert.rules.yml2. Add a rule for high MySQL connection usage:
groups:
  - name: MySQL Alerts
    rules:
      - alert: HighMySQLConnections
        expr: mysql_global_status_threads_connected > 100
        for: 5m
        labels:
          severity: critical
        annotations:
          summary: "High number of MySQL connections detected"
          description: "MySQL connections exceeded 100 for more than 5 minutes."
3. Reload Prometheus:
sudo systemctl restart prometheusThis will trigger an alert if MySQL connection threads exceed 100 for over 5 minutes.
Final Thoughts
Following these best practices ensures that Prometheus MySQL Exporter runs efficiently and securely. Here’s a quick recap:
✔ Update MySQL Exporter regularly to stay secure and up-to-date.
✔ Disable unnecessary collectors to optimize performance.
✔ Secure the metrics endpoint using a firewall and authentication.
✔ Set up alerts to catch MySQL issues early.
With these measures in place, you’ll have a reliable, high-performance MySQL monitoring setup that helps you detect issues before they impact your application.
FAQs
How do I check if Prometheus MySQL Exporter is running?
You can check by accessing http://<server-ip>:9104/metrics in a browser. If it’s running, you’ll see a list of MySQL metrics. Alternatively, use systemctl status mysqld_exporter.
Why is my Prometheus MySQL Exporter not collecting metrics?
Ensure the MySQL user has the correct permissions, the exporter is running on the right port, and Prometheus is correctly scraping the target in prometheus.yml. Restart both services if needed.
Can I use Prometheus MySQL Exporter with Docker?
Yes, you can run it as a Docker container using prom/mysqld-exporter. Ensure you pass the correct MySQL credentials and expose the appropriate port to allow Prometheus to scrape metrics.
How do I fix MySQL Exporter connection errors?
Check if MySQL is running and that the mysqlexporter user has the right privileges. If using a remote database, verify that the MySQL server allows connections from the exporter’s IP.
Is Prometheus MySQL Exporter secure?
By default, it’s open on port 9104. Secure it by restricting access with a firewall, using Nginx reverse proxy with authentication, or enabling TLS encryption for added security.
How often does Prometheus scrape MySQL Exporter?
By default, Prometheus scrapes targets every 15 seconds. You can adjust this in prometheus.yml under the scrape_interval setting for MySQL Exporter to reduce load or increase granularity.
Can I monitor multiple MySQL databases with one exporter?
Yes, by running multiple instances of MySQL Exporter on different ports, each pointing to a different database. Alternatively, use a single exporter with the –config.my-cnf option for multi-instance monitoring.