Looking for an easy way to transfer a WiFi password on Mac? Sharing WiFi from an iPhone to a MacBook is a fast and secure method that eliminates the need to manually enter long passwords. This guide covers what you need before sharing a WiFi password, step-by-step instructions, troubleshooting tips, and common questions. Using this feature makes connecting your Apple devices easier and improves your overall experience.
Table of Contents
Prerequisites for Sharing WiFi Passwords
Ensure Device Compatibility
For WiFi password sharing to work, your iPhone and MacBook need compatible software. Your iPhone must have iOS 11 or later, and your MacBook should be on macOS High Sierra (10.13) or newer. With these versions, both devices can automatically recognize each other and securely transfer the WiFi password—no typing needed.
WiFi and Bluetooth Settings
Make sure WiFi and Bluetooth are turned on for both devices to enable automatic password sharing. Check these settings:
- WiFi is turned on and connected to the network you wish to share on the iPhone.
- Bluetooth is enabled on both the iPhone and MacBook, facilitating the necessary handshake for password sharing.
Optimizing your MacBook’s WiFi performance can prevent bandwidth and connectivity issues.
| Requirement | Description |
|---|---|
| Device Compatibility | iPhone on iOS 11 or later, MacBook on macOS High Sierra (10.13) or newer |
| WiFi and Bluetooth | Both enabled on iPhone and MacBook |
| iCloud and Contacts | Signed into iCloud with the same Apple ID, and contact information saved in each other’s devices |
iCloud and Contacts Setup
To share WiFi without issues, both your iPhone and MacBook must be signed into iCloud with the same Apple ID. Also, ensure your Apple ID email is saved in the MacBook’s Contacts app and vice versa, so both devices recognize each other for secure password sharing. This requirement is designed to enhance security by ensuring that password sharing occurs only between trusted devices. Here’s what you need to do:
- Verify that both devices are logged into iCloud with the same Apple ID.
- Check that your Apple ID email is listed in the MacBook’s Contacts app, and the MacBook user’s email is in your iPhone’s Contacts.
Following these steps prepares your iPhone and MacBook for quick and secure WiFi password sharing without connection issues.
How to Share WiFi from iPhone to Mac: A Step-by-Step Guide
Initiating Connection
To share WiFi from an iPhone to a Mac, first unlock your iPhone and ensure it’s connected to the network you want to share. On your MacBook, open the WiFi settings and select the same network.This prompts a password request from the MacBook to your iPhone.
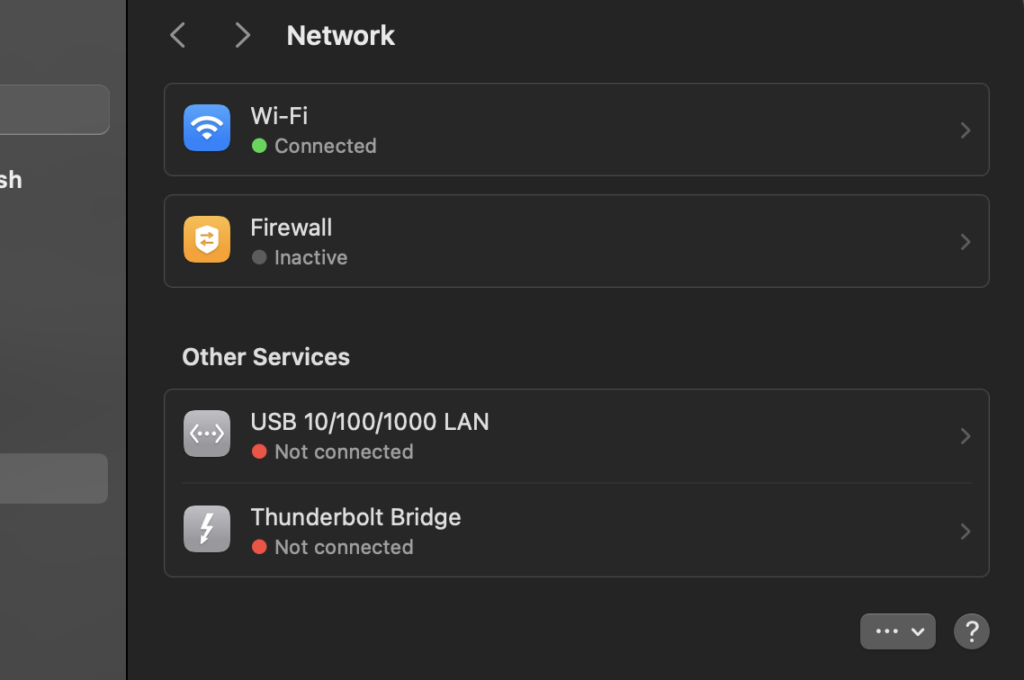
I took the screenshot below to show where the Wi-fi option is under the Network settings:

Sharing the Password
Once your MacBook requests the WiFi connection, a notification will appear on your iPhone asking if you’d like to share the password with your Mac. Tap Share Password, and your Mac will instantly connect without typing anything.
Confirmation and Connectivity
After tapping Share Password, wait for the confirmation message on your iPhone. When you see “WiFi Password Shared”, tap Done. Your MacBook should connect instantly. Look for the WiFi icon on your MacBook to confirm the connection. If the password doesn’t transfer, try the troubleshooting steps below.

Troubleshooting Tips
Common Issues and Solutions
If you’re having trouble sharing a WiFi password from an iPhone to a MacBook, try these fixes to get it working:
- Setup Animation Not Appearing: Ensure both devices are within Bluetooth and WiFi range. Restart both devices if necessary.
- Devices Not Recognizing Each Other: Make sure WiFi and Bluetooth are on, both devices use the same iCloud account, and your Apple ID email is saved in each other’s Contacts.
- Password Sharing Option Not Appearing: Turn off Personal Hotspot on both devices since it may block WiFi password sharing.
If your MacBook won’t connect to WiFi after sharing the password, you may need additional troubleshooting.
Manual Password Entry
If WiFi password sharing isn’t working, you can manually enter the password on your MacBook. Simply select the network, type in the WiFi password, and connect. While this method takes extra time, it guarantees your MacBook gets online even when the automatic sharing option isn’t available.
If you are still experiencing try contacting Apple Support and reading their online knowledgeable and forum.
Advanced Troubleshooting for WiFi Password Sharing on Mac
If your iPhone won’t share the WiFi password with your MacBook, and basic fixes haven’t worked, try these advanced troubleshooting steps:
Check Network Settings on macOS
Sometimes, macOS may have network configuration issues preventing your Mac from receiving the password. To check:

- Click the Apple menu and go to System Settings > Network.
- Select WiFi and ensure it’s turned on.
- Forget the network: Click the More (•••) button next to the WiFi name and select Forget This Network. Then reconnect manually.
- Restart both your Mac and iPhone, then attempt WiFi password sharing again.
Sometimes, your MacBook may connect but fail to obtain an IP address. If you’re facing this, follow our fix MacBook WiFi no IP address problem guide for quick fixes.
Reset Bluetooth and WiFi on Both Devices
Since Bluetooth and WiFi are essential for transferring a WiFi password on Mac, resetting both can help:
- On your iPhone, go to Settings > WiFi, toggle WiFi off and on. Then do the same under Settings > Bluetooth.
- On your MacBook, go to System Settings > Bluetooth, turn it off, wait a few seconds, then turn it back on.
- Try sharing the WiFi password again.
Check iCloud Sync and Apple ID
Your devices must be linked via iCloud and the same Apple ID for password sharing to work. To verify:
- On both the Mac and iPhone, go to Settings (or System Settings on macOS) > Apple ID and confirm they are signed in with the same account.
- On your iPhone, open the Contacts app and check if your Mac’s Apple ID email is saved as a contact. Do the same for the Mac.
- If iCloud sync is lagging, sign out of iCloud on both devices, restart them, and sign back in.
Check for macOS and iOS Updates
Older software can cause WiFi password sharing issues, especially on newer iPhones and MacBooks. To update:
- On iPhone: Go to Settings > General > Software Update and install the latest iOS version.
- On Mac: Open System Settings > General > Software Update and update macOS.
Below is a screenshot I took of my Software Update screen on my Late 2023 MacBook Pro M3 Max. At the time of this article, I’m running the latest macOS Sequoia 15.3.1.

After updating, restart both devices and retry sharing the WiFi password from iPhone to Mac.
Does WiFi Password Sharing Work With Non-Apple Devices?
Apple’s WiFi password sharing feature is designed to work exclusively within its ecosystem, meaning you can’t directly share a WiFi password from an iPhone to an Android device or Windows PC using the same method. However, there are a few alternative ways to securely share WiFi credentials with non-Apple devices.
Sharing WiFi from iPhone to Android or Windows
Since iOS and macOS WiFi password sharing relies on iCloud, Bluetooth, and Apple ID Contacts, it does not support Android or Windows. To connect other devices, consider these methods:
- Use a QR Code: On an iPhone running iOS 11 or later, you can create a WiFi QR code using third-party apps or shortcuts. Android devices can scan the QR code to connect instantly.
- Check Saved Passwords in iCloud Keychain: If you have iCloud Keychain enabled, you can view saved WiFi passwords on a Mac and manually enter them on other devices.
- Manually Share the Password: If none of the automated options work, the easiest way to share WiFi from an iPhone to a Windows PC or Android phone is by manually providing the password.
Future Compatibility with Non-Apple Devices
As of now, Apple’s WiFi password sharing feature does not work with Android or Windows. However, newer WiFi standards like Wi-Fi Easy Connect (DPP), supported on some Android devices, could make cross-platform WiFi sharing possible in the future.
If you’re trying to connect a non-Apple device, using a QR code or manually entering the password is the fastest solution.
FAQs
Can I share a WiFi password from an iPhone to a Windows laptop?
No, Apple’s WiFi password sharing feature only works between Apple devices. To connect a Windows laptop, you’ll need to manually enter the WiFi password or generate a QR code using a third-party app.
Why isn’t the WiFi password sharing pop-up appearing on my iPhone?
Ensure both devices have WiFi and Bluetooth turned on, are signed into iCloud with the same Apple ID, and are within Bluetooth range. Restart both devices and disable Personal Hotspot if the option still doesn’t appear.
Can I view the shared WiFi password on my iPhone?
No, iPhones do not display saved WiFi passwords directly. However, you can view saved WiFi passwords on a Mac by going to System Settings > Network > WiFi or checking iCloud Keychain if enabled.
Does WiFi password sharing work with older iPhones or Macs?
WiFi password sharing requires iOS 11 or later and macOS High Sierra (10.13) or newer. If either device runs an older version, the feature will not work, and you’ll need to enter the password manually.
Can I share WiFi from an iPhone to an Android phone?
No, iPhone WiFi password sharing is limited to Apple devices. To connect an Android phone, you’ll need to manually enter the password or use a QR code generator for quick access.
Will this method work with public or enterprise WiFi networks?
WiFi password sharing may not work on networks requiring additional login credentials, such as public hotspots, enterprise networks, or hotel WiFi. In these cases, manual login is required.
Conclusion
WiFi password sharing between an iPhone and MacBook highlights Apple’s focus on ease of use and security. This feature streamlines connectivity while keeping your network protected, making it a hassle-free way to get online. Following these steps lets you share WiFi quickly between your iPhone and MacBook, making Apple’s ecosystem even more convenient.

